
TL;DR
Moving your rig into a closet can drastically cut noise and echo, but requires attention to airflow and treatment placement. The best results come from strategic positioning, proper materials, and ventilation, not just sound absorption.
Imagine turning a tiny closet into your quiet, high-performance AI workstation. It sounds simple—just toss in a few blankets and call it a day, right? Not quite. The real secret lies in understanding that the best way to tame noise isn’t just absorbing it, but creating distance and controlling airflow. Moving your rig into a closet or small space can cut your noise levels dramatically, but only if you treat it right.
This article will show you how to make a closet setup work—how to choose the right materials, where to place them, and how to keep your rig cool without turning your closet into a sauna. Whether you’re building a dedicated vocal booth or just trying to quiet a noisy GPU tower, these practical tips will help you get the most out of your space.
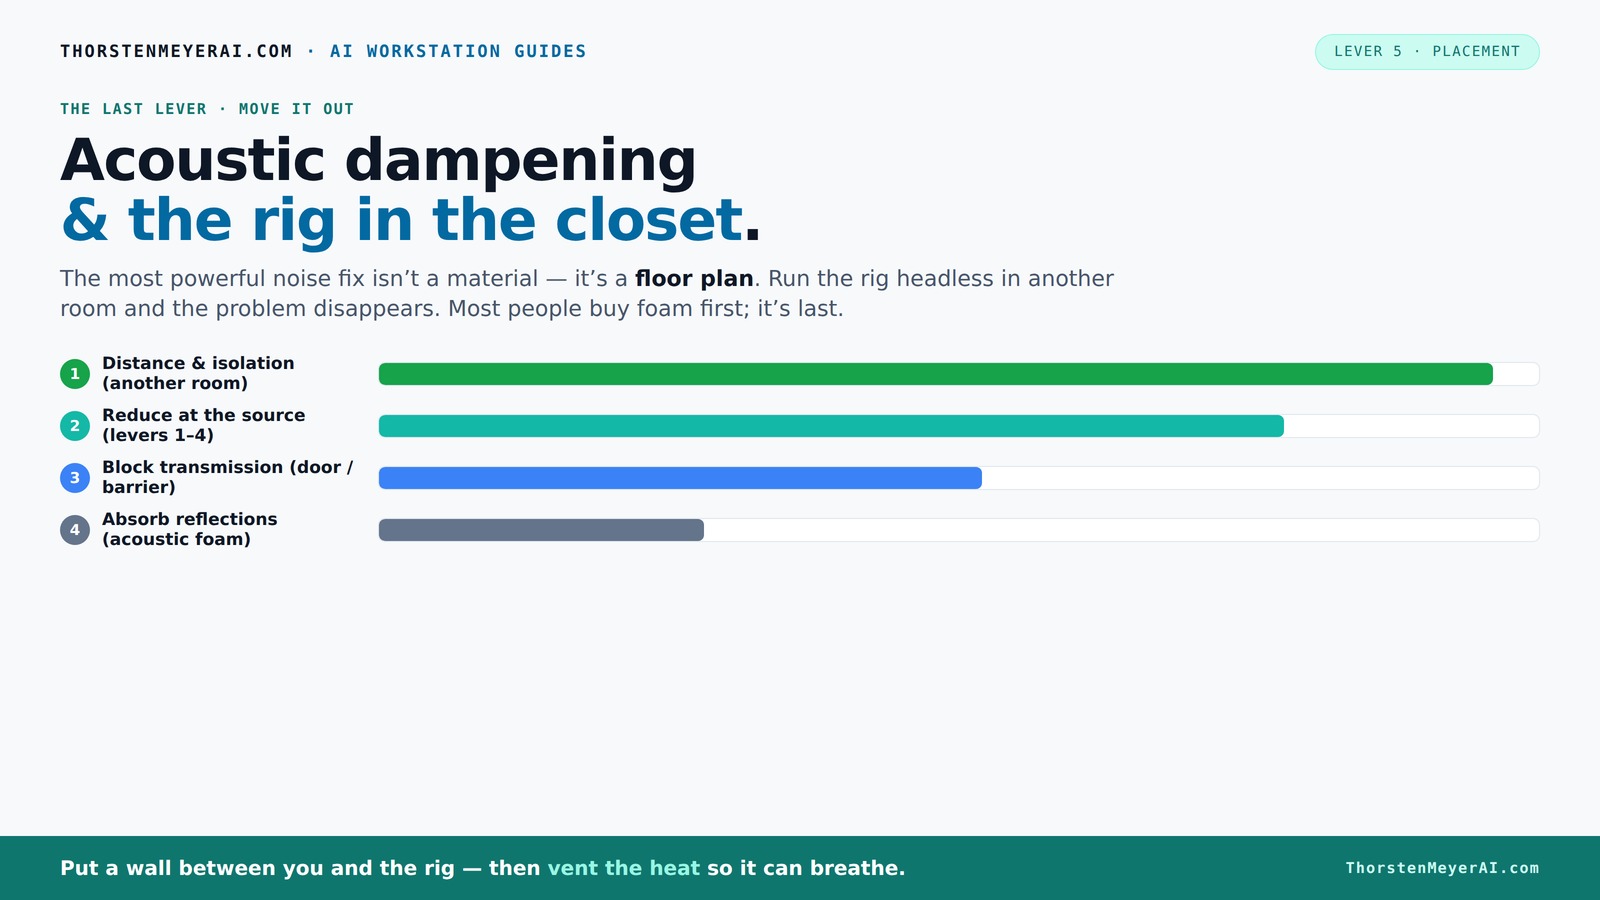
Acoustic dampening
& the rig in the closet.
The most powerful noise fix isn’t a material — it’s a floor plan. A rig you can’t hear because it’s in another room beats any amount of foam. Tap the approaches in Part 1 to see what actually works.
(another room)
(levers 1–4)
(door / barrier)
(acoustic foam)
Contain the noise, not the heat
Key Takeaways
- Moving your rig into a separate room, like a closet, drastically reduces noise and echo, making your workspace peaceful.
- Proper airflow and ventilation are critical; sealed spaces trap heat, which can throttle performance and cause noise from thermal throttling.
- Placement of acoustic panels at first reflection points and in corners is more effective than just covering walls randomly.
- DIY solutions like blankets and foam are great, but sealing gaps and adding bass traps improve overall sound quality.
- Don’t forget the importance of network connection and cable management—distance alone won’t help if you’re tethered by bad wiring.

24 Pack Black 12 x 12 x 2 Inches Pyramid Designed Acoustic Foam Panels, Sound Proof Foam Panels for Walls, High Density and Flame-Retardant Acoustic Panels, Sound Panels for Recording and Home Studio
Exceptional Sound Absorption:These pyramid acoustic panels are engineered to effectively absorb sound waves, reducing echo and reverberation. With...
As an affiliate, we earn on qualifying purchases.
As an affiliate, we earn on qualifying purchases.
Why Moving Your Rig Is The Biggest Win for Noise Reduction
Moving your rig into a different room, like a closet or basement, is the most effective way to reduce noise. It’s like standing behind a wall—sound has to travel farther, lose energy—and suddenly, your workspace becomes a peaceful zone. For AI workstations, this is a game-changer because your only concern then is networking and ventilation.
Think about it: a GPU rig sitting on your desk at 80 dB is loud. But if you hide it behind a wall, it’s silent to your ears. The tradeoff? You need a wired connection or strong Wi-Fi, and a plan for ventilation. But the noise? Gone.
This approach is especially perfect for AI workflows. Instead of fighting noise with foam, you just avoid the noise entirely by putting the rig elsewhere—like in a closet—where it can roar to its heart’s content without disturbing your focus or neighbors.

be quiet! Silent Base 802 ATX Midi Tower PC Case | 3 Pre-Installed Pure Wings 2 Fans | Sound Insulated | Black | BG039
VERSATILITY: Interchangeable top cover and front panel cater to either maximum airflow or silent operation.
As an affiliate, we earn on qualifying purchases.
As an affiliate, we earn on qualifying purchases.
The 'Rig in the Closet' Setup: How to Make It Work Without Cooking Your Hardware
Placing a hot, high-load machine in a closet sounds perfect—quiet and out of sight. But here’s the catch: heat traps. A sealed closet with a continuously working GPU can turn into a mini oven, throttling performance or even damaging your hardware.
To prevent this, you need active airflow. A simple setup involves an intake vent and an exhaust fan—quiet, but effective. Better yet are purpose-built soundproof cabinets with ducted cooling, which combine noise reduction with proper heat dissipation.
For example, you could install a small exhaust fan on the closet door or wall, with a vent hose directing hot air outside. This keeps the temperature stable and your rig cool, even during long runs. Check out this guide for detailed ideas on airflow and cooling solutions.

Gainsh Crawlspace Ventilation Fan, 720 CFM Stainless Steel Basement Vent Fan, Ultra-Thin Reversible Airflow Window Exhaust Fan for Kitchen, Garage, Attic, Crawl Space & Grow Tent
Powerful 720 CFM Ventilation with Reversible Airflow This crawlspace ventilation fan delivers 720 CFM strong airflow for efficient...
As an affiliate, we earn on qualifying purchases.
As an affiliate, we earn on qualifying purchases.
Where to Place Acoustic Treatment for the Best Sound Quality in a Small Space
Acoustic dampening in a tiny room isn’t about fully soundproofing—it's about controlling reflections and echoes. The first step: treat the primary reflection points. Place absorption panels behind your mic and on the side walls where sound bounces back into the mic’s path.
In a closet, the walls are close and parallel, creating standing waves and low-end buildup. To fix this:
- Apply acoustic foam or panels on the wall behind the mic.
- Place foam or blankets on side walls near the mic.
- Cover the ceiling with foam or a thick blanket to reduce flutter echo.
- Don’t forget the floor—add a rug or carpet to dampen reflections.
- Use bass traps in corners if you notice low-end boom or standing waves.
For instance, hanging a thick blanket over the closet door can cut reverb and reflections dramatically, especially when combined with foam panels on walls and ceiling. The goal: make the space sound focused and clutter-free for vocals or mic recordings.

72in 3-Panel Soundproof Room Divider with Wheels, Heavy-Duty Acoustic Partition Temporary Wall for Noise Reduction, Portable Divider for Home Hospital Library Classroom - Light Grey
【Noise Reduction】Our room divider can absorb at least 85% of the noise, creating a quiet environment without being...
As an affiliate, we earn on qualifying purchases.
As an affiliate, we earn on qualifying purchases.
Materials That Turn Your Closet Into a Sound-Absorbing Fortress
Picking the right materials makes all the difference. Here’s what works best:
- Acoustic foam panels: Absorb high frequencies, tame echo, and soften reflections. Best placed at first reflection points.
- Moving blankets or thick quilts: Quick DIY fix, ideal for covering doors or creating makeshift walls.
- Bass traps: Funnel low-end energy into corners to prevent booming or muddiness.
- Weatherstripping or foam strips: Seal gaps around doors and vents to prevent sound leaks.
- Rugs or carpets: Reduce floor bounce and echo, especially on hard flooring.
For example, layering foam panels on the walls with a thick blanket over the door can turn a noisy closet into a decent vocal booth. Use this guide for detailed material choices and placement tips.
How to Optimize Your Closet Setup: Practical Steps for Success
Here’s a quick step-by-step to turn your closet into a sound-optimized space:
- Clear out and clean the closet—remove anything that could rattle or vibrate.
- Install a sturdy shelf or mount for acoustic panels at reflection points.
- Hang blankets or foam on the door, ceiling, and side walls.
- Place bass traps in the corners if you notice low-frequency issues.
- Set up a quiet exhaust fan or vent to keep air flowing—don’t seal it totally.
- Test the space with a mic and listen for echo, then add absorption where needed.
For example, a user on YouTube transformed a closet into a recording booth using foam, blankets, and a small vent fan—all DIY and under $200. The key? Think modular and adjust as you go.
Common Mistakes That Kill Your Closet Setup’s Effectiveness
Avoid these pitfalls to keep your closet rig working smoothly:
- Sealing the closet completely without ventilation—heat builds up fast.
- Ignoring the door gaps—sound leaks through cracks unless sealed properly.
- Overusing foam—more isn’t always better; too much deadens the sound and makes it unnatural.
- Neglecting low-end treatment—bass traps in corners prevent muddy recordings.
- Using cheap, thin blankets—thick, dense materials work better for absorption.
For example, sealing a closet door with weatherstripping and adding a vent fan can prevent heat buildup and sound leaks, keeping your setup both cool and quiet.
The Final Word: Quiet, Cool, and Focused—Your Closet Can Do It All
Turning a closet into a quiet rig isn’t just about noise reduction. It’s about creating a balanced environment—cool, sound-optimized, and out of sight. With careful placement, good materials, and proper airflow, your closet can become a secret weapon for high-quality recordings and AI work.
Remember: the biggest gains come from moving the rig away from your workspace and controlling reflections. Treat your space thoughtfully, and your audio quality will skyrocket.
So, next time your GPU starts roaring, consider the closet. It might just be the best upgrade you never knew you needed.
Frequently Asked Questions
How much acoustic treatment do I really need in a tiny closet?
In a small space, covering about 20-30% of wall and ceiling surfaces with absorption materials like foam or blankets is enough to significantly reduce echo and reflections. Focus on reflection points and corners for the best results [4].Will blankets work as well as professional acoustic foam?
Blankets, especially thick and dense ones, work surprisingly well for DIY absorption, but they’re less precise than purpose-built panels. They’re great for quick fixes and sealing gaps, but for optimal sound control, combine with foam or panels [3][5].How do I prevent my closet rig from overheating?
Install active ventilation with intake and exhaust fans, or use ducted cooling solutions. Never fully seal a closet without airflow—hot air needs a way out, or your hardware will throttle or overheat [2].Should I treat the door or just the walls?
Treat the door with blankets or foam to prevent sound leaks. Gaps around the door also need sealing with weatherstripping or acoustic sealant for maximum soundproofing inside the space [3].Can a closet setup actually improve vocal recordings?
Yes. Small, reflective spaces like closets can produce clearer, more focused vocals by reducing ambient echo. Just remember to treat reflection points and keep it from sounding overly dead or boxy [4].Conclusion
Your closet can become a quiet sanctuary for your AI workstation or vocal recordings—if you treat it right. Focus on sound reflections, airflow, and proper placement, and you’ll get a space that’s both cool and whisper-quiet.
Think of it as turning an ordinary closet into a secret weapon: a tiny, controlled environment where noise is tamed and performance is maximized. Your future self will thank you for the quiet, focused space.